I really enjoy making these side step cards; they are so easy to make and the base is just one sheet of A4 card. So I have two more to share with you today.
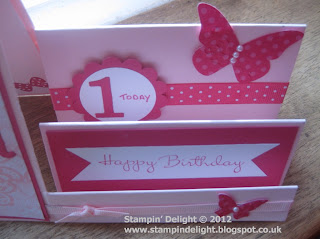
I made this first one for an order. She asked for pink, pretty and butterflies for Isla’s First Birthday card. I think it fits the bill … don’t you?
The card base is in Pretty in Pink Cardstock and the main panel is decorated in a piece of the gorgeous Flirtatious Speciality Paper with a few die cut butterflies from Beautiful Wings in Melon Mambo card stock. I did the name in the same way using the Timeless Type Alphabet dies … what did I do before I had these? They may not be a cheap addition to the craft stash, but I’ve definitely had my money’s worth already.
The three steps were decorated in matching colours with a strip of the Spotty ribbon in Melon Mambo and a die cut butterfly from the Brights Designer Paper stack. I added a die cut number 1 onto a punched circle to celebrate this little girl’s First Birthday. The second step features a sentiment from that fabulous stamp set Happiest Birthday Wishes and a simple strip of Pink Pirouette ribbon and another butterfly to finish off the last step.
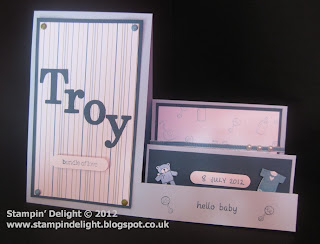
The second card is another personalised card I made for the new arrival at my next door neighbours. I didn’t make it straight away as they couldn’t decide on a name for over a week! Finally Troy was named and I set to work to create this card.
Same simple design with the the card base in Bashful Blue and main panel decorated in Nursery Nest papers, layered up onto Not Quite Navy cardstock. I added one of the Brights collection brads to each corner.
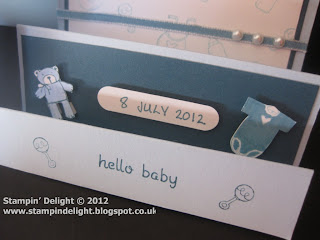
Apologies for the poor pictures … it was dark when I finished this one! The largest step was layered with a a piece of Whisper White cardstock and randomly stamped with the small images from Bundle of Love. The second step features a Word Window to highlight the date of birth and two more of the images stamped and cut out with my Paper snips. A little more stamping on the small step and a sentiment from Teeny Tiny wishes.
Hope you like these cards, they are super simple to make but very effective.
Right, must dash as have a mountain of ironing to tackle that would fill 5 of my laundry baskets and it’s staring at me menacingly! 😉
Hasta la próxima / until next time
Louise x
Supplies Used: (All Stampin’ Up! Unless Otherwise Stated)
- Card – Melon Mambo, Whisper White, Not Quite Navy, Pretty in Pink, Bashful Blue
- Papers – Flirtatious Designer Paper, Nursery Nest Designer Paper
- Stamps – Bundle of Love, Teeny Tiny Wishes
- Embellishments – Adhesive Pearls, Brads, Melon Mambo Scallop Dots Ribbon, Pretty in Pink 1/4 Ribbon
- Tools – Timeless Type Alphabet Dies, Paper Trimmer, Word Window Punch, Beautiful Wings Embosslits,
- Mediums – Melon Mambo ink & marker, Not Quite Navy ink, Bashful Blue marker
What do you think about today’s project. Let me know below.




Loving this beautiful creation.
Hop on over to Doing Life – for a chance to win some lovely digi stamps.
Hugs
Desíre
Doing Life
Digistamps4Joy DT Member
Tammy’s Scrapin Corner DT Member